Hello Community [Blocked Image: https://forum.gfx-engine.org/images/smilies/smile.png]
with this tutorial i like to show you how to create your first Project with GFX. For this you need the latest version from Visual Studio. You can download it from here https://visualstudio.microsoft.com/en.
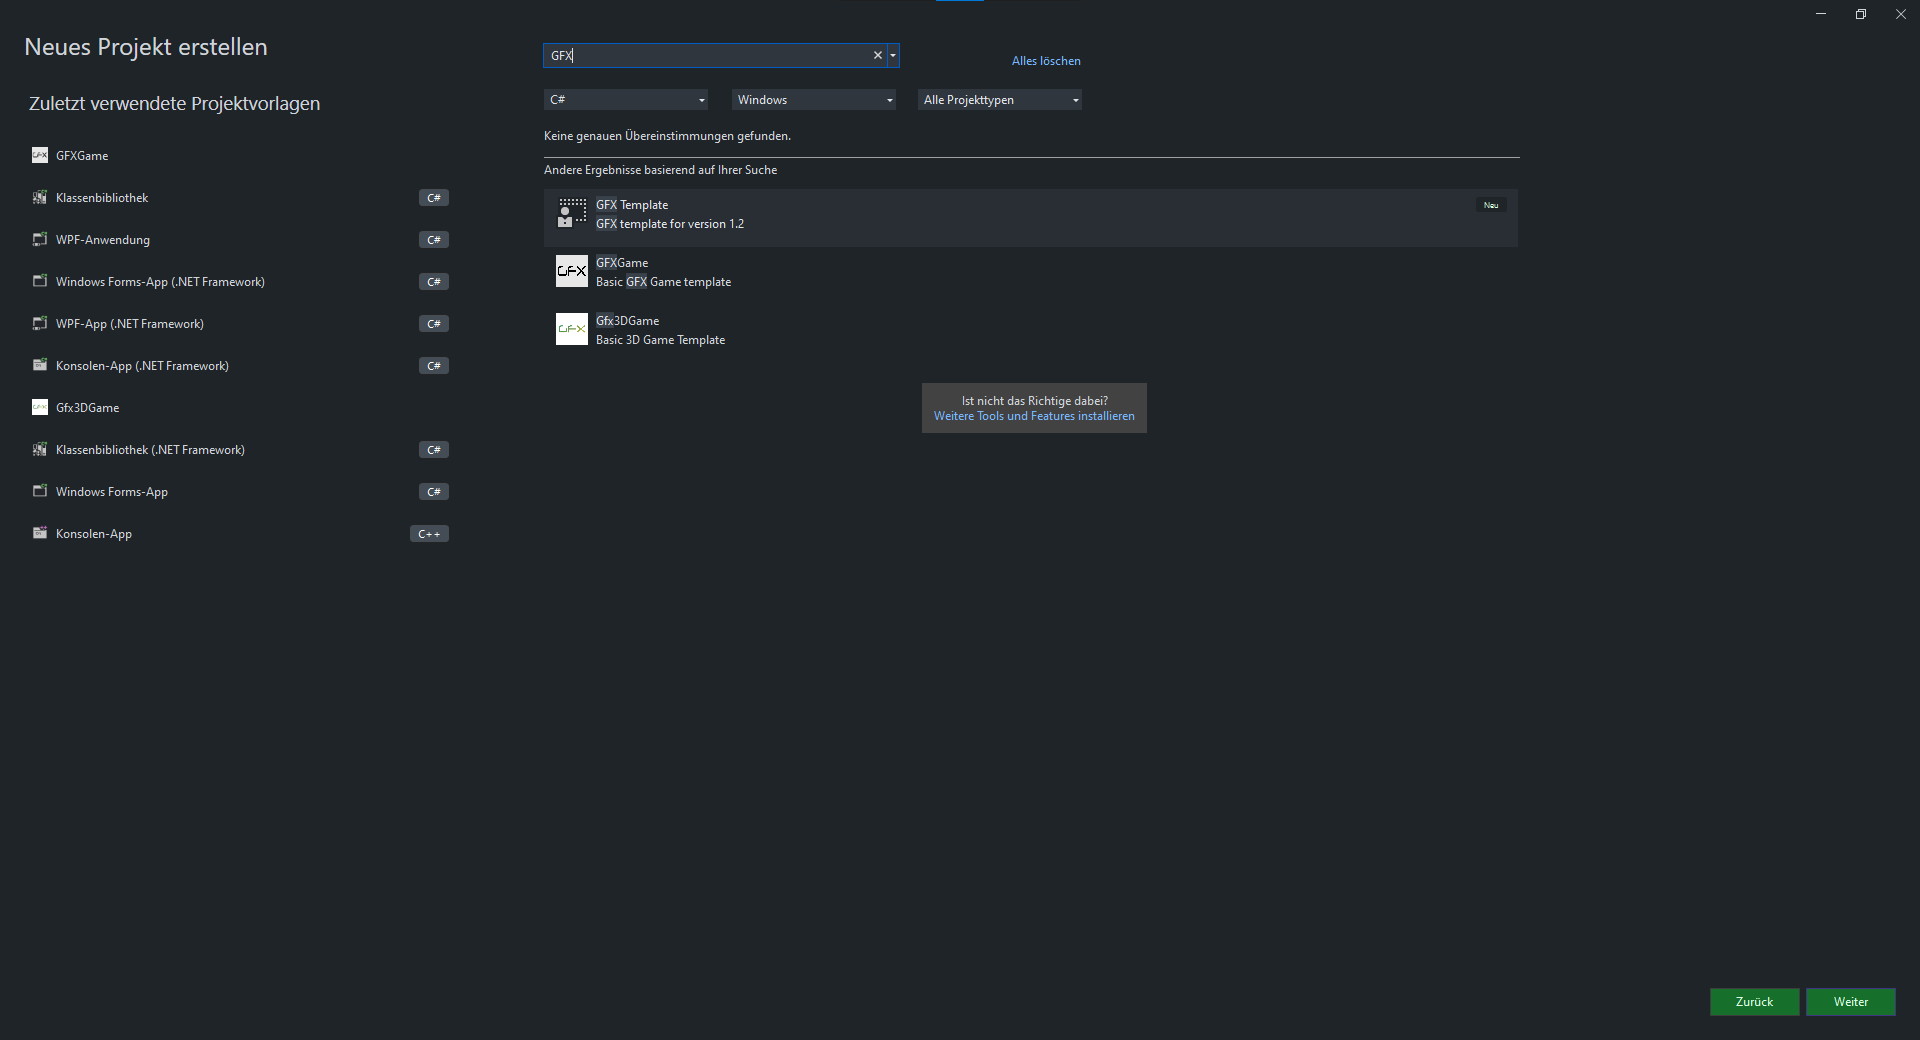
After you downloaded and installed visual studio you can download the project template. This template will help you create and setup new projects with the visual studio assistant like in the screesnshot below.
If you dont know how to install visual studio templates you can have a look here: Locate and organize project templates - Visual Studio (Windows) | Microsoft Learn.
In addition to this you need to download the latest release from the engine it self. You can find it here: Releases · Andy16823/GFX (github.com)

After you created your new project you will need to add references to the genesis.dll wich you have downloaded from the latest release. After this you need to build the project for the first time. Importan you need to create an x64 build. After your first build you can open the Form1.cs code and should see something like the code bellow:
Display All
From this point on you can Run the project and should see an black screen which is totaly normal because you dont have any GameElement in your scene yet. This is the point where you can start to create your scene and build your game.
For models, Textures and sprites you want to add into your project you can simply copy them into the Resources folder within your Visual Studio solution and select the option to copy the file into the output directory within the file propeterys.
with this tutorial i like to show you how to create your first Project with GFX. For this you need the latest version from Visual Studio. You can download it from here https://visualstudio.microsoft.com/en.
After you downloaded and installed visual studio you can download the project template. This template will help you create and setup new projects with the visual studio assistant like in the screesnshot below.
If you dont know how to install visual studio templates you can have a look here: Locate and organize project templates - Visual Studio (Windows) | Microsoft Learn.
In addition to this you need to download the latest release from the engine it self. You can find it here: Releases · Andy16823/GFX (github.com)
After you created your new project you will need to add references to the genesis.dll wich you have downloaded from the latest release. After this you need to build the project for the first time. Importan you need to create an x64 build. After your first build you can open the Form1.cs code and should see something like the code bellow:
C Source Code
- using Genesis.Core;
- using Genesis.Graphics;
- using Genesis.Graphics.RenderDevice;
- using Genesis.Math;
- using Genesis.Physics;
- using System;
- using System.Collections.Generic;
- using System.ComponentModel;
- using System.Data;
- using System.Drawing;
- using System.Linq;
- using System.Text;
- using System.Threading.Tasks;
- using System.Windows.Forms;
- namespace GFXGame
- {
- public partial class Form1 : Form
- {
- private Game m_game;
- /// <summary>
- /// Initial the game
- /// </summary>
- public Form1()
- {
- InitializeComponent();
- // Create the render settings
- var renderSettings = new RenderSettings()
- {
- gamma = 0.5f
- };
- // Setup the game class and load the assets from the "Resources" folder. Make sure you copy them into the output directory!
- m_game = new Game(new GLRenderer(this.Handle, renderSettings), new Viewport(this.ClientSize.Width, this.ClientSize.Height));
- m_game.AssetManager.LoadTextures();
- // Setup a demo scene with an camera and an physics handler
- var scene = new Scene("MyTestScene");
- scene.AddLayer("BaseLayer");
- scene.Camera = new Camera(new Vec3(0, 0), new Vec3(m_game.Viewport.Width, m_game.Viewport.Height), -1.0f, 1.0f);
- scene.PhysicHandler = new PhysicsHandler2D(0f, 0f);
- // Hook into the update event. You can use this lambda or create an own function for it.
- m_game.OnUpdate += (game, renderer) =>
- {
- Console.WriteLine(game.FPS);
- };
- // Add the scene to the game and run it
- m_game.AddScene(scene);
- m_game.LoadScene("MyTestScene");
- m_game.Start();
- }
- /// <summary>
- /// Resize the game
- /// </summary>
- /// <param name="sender"></param>
- /// <param name="e"></param>
- private void Form1_Resize(object sender, EventArgs e)
- {
- m_game.Viewport.SetNewViewport(ClientSize.Width, ClientSize.Height);
- if (m_game.SelectedScene != null)
- {
- m_game.SelectedScene.ResizeScene(m_game.Viewport);
- m_game.SelectedScene.Camera.Size = new Vec3(m_game.Viewport.Width, m_game.Viewport.Height);
- }
- }
- /// <summary>
- /// Stops the game
- /// </summary>
- /// <param name="sender"></param>
- /// <param name="e"></param>
- private void Form1_FormClosed(object sender, FormClosedEventArgs e)
- {
- m_game.Stop();
- }
- private void Form1_Load(object sender, EventArgs e)
- {
- }
- }
- }
For models, Textures and sprites you want to add into your project you can simply copy them into the Resources folder within your Visual Studio solution and select the option to copy the file into the output directory within the file propeterys.
